Tuesday, September 18, 2012

Land Combat System for Veni Vidi Vici

I developed a combat system to handle battles that occur onboard that I don't want to handle with miniatures.

My goal was to create a flexible system where some tactical choices can be made to make battles interesting (rather than just an odds- based combat roll). What follows is a very generic overview.

The side that initiated the battle is the attacker (of course), and the other the defender (of course). Defending does not mean that he cannot counter-attack the attacker.

The way to defeat the enemy army is to reduce its Army Morale.

Both sides have a reserve of all units in the battle. These are composed stacks of units as they desire, up to limits (4 units if leader is in stack, 3 otherwise). This is done simultaneously and secretly before the battle is resolved. Stacks cannot be changed once battle has begun. This models the initial dispositions of the armies and stacks that take casualties can become very vulnerable.

Here's an example: of creating stacks from an army
Click to enlarge
The original army composition is 1 leader, 1 Heavy Cavalry (HC), 2 Legions (HI), 1 Light Infantry (LI), and 3 Skirmish Infantry (SI). Note that only the HI and LI have reverse sides (e.g. when damaged they are reduced, not eliminated). Here are 3 different compositions (amongst many more possible).

Option A is a max combat stacking. The 1st stack is flexible enough to lead with HC or HI depending on what opposing stack it is facing. Both stacks have SI and LI to inflict/deflect incoming enemy missile troops. But if the enemy has 3 or more stacks, this setup will suffer from enemy flanking.

Option B is more of an attack with cavalry setup, and would work well if he can get the flanking bonus (applies if one side has more non-SI stacks than the other side), as he can keep the cavalry back and use for pursuit instead of direct combat).

Option C is a more balanced approach. The light stack could be used for outflanking purposes but the main punch is located in the other 2 stacks.

There are many permutations/combinations that can be made, allowing free reign of genius/idiot deployments that can influence a battle. You have enough leeway and rope to hang yourself or your enemy...

Continuing with the battle resolution:

Both sides check for initiative. The side with more scouting points (Skirmish, Light or Cavalry units counts for this) has a bonus to the iniative.

The side with initiative can choose one of 3 actions: Assault, Withdaw, Defend (defender only).

To Withdraw, it must pass a withdrawal roll. Failure to withdraw may cause army morale to slip.

A Defend allows the defender (only) to force the attacker to perform an assault, with the attacker allocating his stacks first.

An Assault is where the winner of the initiave chooses which stack(s) to assault which defending stacks.

Note: The assaulting/defending side does not have to use all its stacks. It can choose as many as it desires to use for that assault but must choose at least one.

For each stack battle, each side allocates a primary unit that will bear the brunt of the combat, while the rest are in support.

For each stack battle:

Missile fire is performed by both sides simultaneously and casualties (if any) are inflicted.

Combat is simultaneous unless the primary unit is a cavalry or elephant vs an infantry unit NOT across a river (called bonus terrain and applies to walls, amphibious landings etc). Terrain (obviously) influences this roll.

Effects from each stack battle are applied, and casualties taken.

After all stacks have fought a round of battle, each army takes an Army Morale check to see if their morale erodes. A side that winds up with more primary units destroyed is at a disadvantage.

Army morale for the loser is reduced. If it is reduced too far (or the difference between the rolls is too high) the losing side routs. If it is reduced to 0 or -1, the loser withdraws.

A routed side can be pursued by the winning side.

If neither army routs or withdraws, all stacks are returned to their respective reserves and both sides check initiative again, and the process continues.

To the right is the current battle-board that allows an easier appreciation of the battle structure (click to enlarge).

The combat system has a lot of other detail in it than described here, and it generates interesting battles where the largest army does not always win. And in the end, that is the point as minaiture games tend to be that way.

Monday, August 6, 2012

Caesar vs Britannia Iterum

The advantage of a consolidated map is that I can use smaller parts for various scenarios with a little (sometimes a quite a bit :D) of editing. Working with large maps requires some patience, as there are a lot of elements to handle (layers, etc) and even on my great computer it sometimes chugs a little....

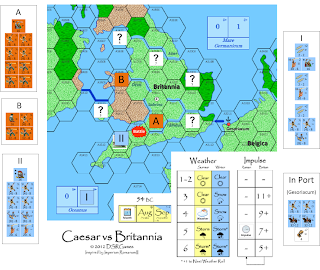
Here's the re-created Caesar vs Britannia scenario using the new map that fits on an 8 1/2" by 11 sheet:

Click to Enlarge

I might try a Caesar vs Gaul next (on an 11"x17") or maybe some Punic Wars (also 11"x17"). I could do a Peloponnesian war and think it'll fit on an 11"x17" along with Sicily.

Time will tell

Wednesday, July 18, 2012

DSR Veni Vidi Vici campaign map

I've completed the 1st pass of what I'm calling my "DSR Veni Vidi Vici" map (DSR V3 for short). It is over 120" wide and 40" long. It can be divided up into 3 maps of about 40" wide and 40" long.)

In this incarnation, it is geared toward major powers (Roman, Carthaginian, Parthian, Mauryan, and Han Chinese) fighting over the world. It is a campaign boardgame I can use to generate miniature battles (if desired). In that vein, I had to ahistorically add in some areas to make it playable (as well as adding "best guestimate" cities to those areas), while retaining the flavor areas of the map.

Here is a reduced size version of the whole thing:


Click to enlarge

Here are some selected map cuts:
Click to enlarge

Click to enlarge

Click to enlarge
I want to do some more work with India and add some parts to the Arabian Penninsula, as I'll need to "shoehorn" (pun intended) Axum (e.g. the Horn of Africa) and Southern India for completeness.

The beauty of this map is that I can re-draw the borders, assign the cities, change the terrain as I desire (albeit with a little elbow grease !) to fit any period I want to use as everything is consistent in size (about 40 miles per hex).

There's still more work to do.....

Saturday, July 7, 2012

And now for something (sort of) completely different....

I wanted to expand my DSR Imperium Romanum Map to include more of the world, but found I had to skew it badly, so I took the bull by the horns and redrew the whole thing from scratch !

In the end it wound up being over 130" wide (and 40.5" long).

Click to enarge
This allowed me to expand my game to include the Parthians, Mauryan Indian, and Han Chinese. As it is a consistent scale, I can create another map to include Axum and southern Arabia and southern India (or Africa, or the Americas or whatever).

With this map I can structure campaigns such as the conquests of Alexander the Great, the gyrations of the Warring States period or any other period that fits on the map.

The next step is to add in the cities (and population centers) and province borders (for conquest and control purposes). Then there's sea zones, crossing points, and some graphical changes (I'm not quite happy with the steppe and desert symbols). There's a LOT of work left to do.....

Tuesday, May 29, 2012

Caesar vs Britannia Turn 1

This is the first turn of the scenario with the rules in their current form.

Caesar and his forces (2 legions, 2 Auxilia, and 4 Skirmish infantry units) are aboard ship and disembark to amphibiously invade the southern coast. He decides to invade away from any village, as this could immediately mobilize and allow them to contest the invasion. He wins the invasion easily (being opposed only by some nominal defense units) and lands.

Casselivaneus is randomly determined to be in the center at village 4 after the invasion. He is too weak by himself to attack, but from his position he defends a large portion of the island from Caesar's landed force.
Click to enlarge
Now, the weather takes a turn for the worst (Storm), damaging Caesar's fleet (he loses 1 ship counter) and forcing them back and into port. Isolated and alone, Caesar decides to advance to village 1 instead of taking on the force of Britons immediately to the North.

For the Britons, village 6 mobilizes (force B). Cassilivaneous rolls a bad AP roll (you need Action points to do things) and comes up with a "1". He wanted to consolidate Force A & B, but decides to make the best of it and move to a more central position to contest Caesar's advance when he moves East. Delay is the name of the game and the storm weather favors the Briton cause.

Click to enlarge
The weather finally changes to clear for the next impulse and he brings his loaded, but depleted fleets out of port. He decides to forgo bringing cavalry over from Gaul and instead chooses a force he can use to invade (with a leader) or reinforce Caesar as neccesary.

With the clearing of the weather, Caesar burns Village 1 and decides to move East. Cassilivaneous reacts and a battle is fought.

The Romans win the ensuing battle with the damage to a Light unit and the loss of a Skirmish unit. The Britons lose 1 Warband and 2 Skirmish units.

Despite losing the battle, Cassilivaneous delays Caesar's advance and chooses to take up a better defensive position. The Britons should only get stronger in the coming turns as more villages mobilize.
Click to enlarge
The Britons manage to merge the Northern force B with his main force A for his impulse. He checks for the end of the the turn for the month and it ends.
Click to enlarge
As things stand for the month of the Qunitillis (as July hadn't been renamed yet for Caesar as of yet :D), Caesar is ashore and has burnt 1 village. He has weathered (pun intended) bad weather, fought a minor battle and put himself in a position to advance further into the island. His forces at sea can either invade elsewhere or be merged with Caesar to destroy Cassilivaneous' army.

Cassilivaneous has managed (with a little help from the weather Gods) to minimize the damage done, and amass a decent force to contest the next Roman advance.

Monday, May 14, 2012

Caesar vs Britannia (Rount Two)

I've created a small scenario based on Caesar's 2nd invasion of Britain in 54 BC to test and tweak my boardgame rules . The board area is a modified part of my bigger DSR IR map:

Click to enlarge
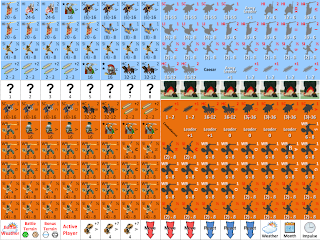
Here are the forces and misc marker counters: (note all but the last row show are double-sided):
Click to enlarge
The Romans start in the port in A2211. The Britons start on the 8 mobilization points randomly with "?". Each turn they roll to see what (if anything) mobilizes.

Victory for the Romans depends on pillaging the mobilization points, along with (maybe) killing Cassivelaunus. Victory for the Britons involves destroying legions and preventing pillaging of tribal points. Of course they gain an automatic victory for killing Caesar himself.

I can fight the battles generated using a battle-board system (I'll have to make a blog post about it sometime to explain it a bit) or using my miniatures rules as desired.

The boardgame rules allow for sea movement and invasions, as well as weather. It is a an I-go-You-go system, but with possible reaction moves by the non-moving side and the turns variable,  you can never nail down when a turn will end with certainty.

The situation is interesting, as the Romans have a somewhat limited fleet but can land almost anywhere, while the Britons are scattered at first. Does Caesar land a small force and push inland in an attempt to overwhelm some of the scattered tribes (scattering his forces in the process) or does he make a more careful buildup, allowing the Britons to coalesce ?

With the season possibly changing in September to winter (ending the scenario) and the possibility of nasty weather (which can damage his fleet) during the other months, Caesar has to quickly and decisively make his mind up and execute his plan.

As a side note, in testing my version 1.0 of the rules, I used a ad-hoc Gaulish uprising scenario.

Caesar craftily side-stepped a river between a large Gallic force and managed to engage it on more favorable terrain. The hard fought battle caused lots of casualties to the Gauls but Caesar's Army still took some casualties, which caused its Army to fail its morale check and forcing withdrawal. In the pursuit after the battle, he lost his baggage train, causing further losses due to attrition before he could get back to friendly territory.


After the battle I noted that the hex the battle occurred was Gergovia ! I kind of took that as a sign that I'm doing something right with the game :)

Wednesday, May 9, 2012

DSR Imperium Romanum Map

I think I've finally gotten a more finalized version of my Imperium Romanum map I'm happy with (for the moment :D) :
Click to enlarge

Its been reduced to 30% size so I can upload this up to my blog.

I've changed a number of the provinces (e.g. broken some of them up), added/removed a few cities and changed sea movement to sea-boxes (this greatly simplifies sea stuff).

These changes were done so that I can run my campaign game the way I think it should. With the addition of my province cards (and additional province properties).

I've of course created my own rules and counters, some of which I hope to post on this blog.

In addition, I hope to put together a mini-quasi historical game covering Caesar's campaigns in Gaul using my new rules and counters as well as a partial play-by play

As always, stay tuned ! :)


Friday, May 4, 2012

Province Cards

I've created province cards for my modified Imperium Romanum campaign game (named DSR IR). These are snapshots of the game map, along with some of the important features of that province (if any).

Click to enlarge
I'll use these for each of the major powers to help them keep track of the money and total population(important for mobilizing units) they control. In addition, I can use the deck for random events.

Its all still a work in progress though :D

Thursday, April 26, 2012

Imperium Romanum II Map (Reduced) and Detail (Partial)

Here is the latest version:
Click to enlarge

I've reduced it 25% (its a 12 meg PNG file at full size).

Here is a detail map cut at what should be full size:
Click to enlarge

I've put off doing the road/city periods for the moment and reverted to the standard designations for temporary cities.

I'm currently working to make it into my campaign system (Vini Vidi Vici) and will make a few changes to it for those purposes (as always on layers so I can revert it to the standard game if desired :D)

Saturday, April 21, 2012

Imperium Romanum II- Pass 2

Here's the 2nd pass over the map, including the boundaries, cities and the structural stuff (Cultivated/Wild/Road/No Road) stuff for periods 1 & 2.

I've not included the cities that are not permanent (yet).

A hex with a dot in it has roads. A hex with an ID is considered cultivated. A hex that is cultivated and has roads has an ID and a dot.

This map was shrunk to 1/4 size for space purposes. It measures more than 60" wide with 3/4" hexes.

Click to Enlarge

Friday, April 20, 2012

A new map: Imperium Romanum II

This is the first pass for a re-draw of an old favorite wargame of mine- Imperium Romanum II.


click to enlarge
The full size is over 60" wide with .75" hexes. This is a quarter-size PNG version.

I found there is a yaho group for the game at

http://games.groups.yahoo.com/group/Imperivm_Romanvm/

I'm still playing with the colors, some of the icons and haven't included the province boundaries or cities yet.

Tuesday, April 3, 2012

Sorry yet again for slow posting....

Been a slow couple of months. I hope to get some posts up when I can cure my computer of the problems it is having (or finally break down and buy a new one.). Please stay tuned :D

Thursday, February 2, 2012

Geomorphic Hex "hexes"

A potential client wanted some ideas on how to make dungeon geomorphic hex "hexes" and some ideas on a random dungeon generation game. Unfortunately for me, the nothing came of it. Fortunately for you, I can post one of them here and discuss little it :D

Here is a typical Hex.
Dungeon Geomorph B04

Doors would be handled by counters placed at the appropriate spots (3 on this one). The "?" would be revealed by random generation when you came into Line of Sight of any of the 3 hexes it is touching.

I can easily create these now that I have a process down to do so. I settled on 3/4" hexes so that each Hex fits on a single A5 sheet for printing purposes.

Wednesday, February 1, 2012

Back from hiatus....

I'm back from hiatus and have a backlog of things to make into postings.

Stay tuned....