Tuesday, October 19, 2010

The War to End All Wars....

A few years ago, a friend of mine came up with some fantastic 3" trench hexes and barbed wire for 15mm World War I games. I made some simple rules (2 pages of rules) and they appeared to be fun (from input from the players), as well as fast (games play usually in under an hour).
The current board and pre-set up. A typical "squad" is at the bottom of the picture.
The premise is simple- you and up to 2 other players are German night trench raiders. You are in a race to garner more points than the other players. The players are to take their squads (10 men and 2 leaders) to kill as many of the enemy (in this case it was French) and take bunkers before they reach less than 50% strength (after which they are considered to have withdrawn). In addition, each player has 6 grenades and 2 medical packs to help accomplish their task.

Why are the attackers German ? Simply because I have lots more painted French and British and only a few Germans painted up. It also let me call the rules "Stahlgewittern" (Storm of Steel)- named after the book by Ernst Jünger as it seemed appropriate.
 
The trench consists of MG positions (4 in front), regular trench line, and bunkers (from where large amounts of enemies may come). The lighter ? markers are potential spots where enemies can be activated (usually 1-3 riflemen). The red ? markers are bunkers (usually 9-12 figures) and MG nests (usually MG, but may be composed of 3 riflemen).

The attackers each take a set of 3 consecutive shell holes and setup in these on the other side of the wire. After setup, I roll to see if there are gaps in the wire, which can influence the paths the attackers have to take to get into the trench.

The defenders (the French) are controlled by die rolls and a simple logic tree. They are activated by being in range of the attackers or a grenade attack. Their actions range from firing at a target (it is nighttime, so the range is limited to visibility), charging down the trench, to throwing grenades.

There are events in the game that can happen. It consists of things like "starshell", which increases the visibility to the length of the board and "returning enemy patrol", which appears on a particular player's shellholes as they work themselves back to their lines.

As the game progresses, the player's troops take wounds that can be healed by medical packs. Of course, there is also the chance of instant death instead of wounding. Leaders help in getting players to charge enemies and to be able to fire at enemies charging at them as the defender will charge a lot when you are in his trench. This tends to create wild melee's that are always exciting to resolve.

As soon as a player reaches less than 50% active troops, he is out of the game. The other players keep going until they also reach 50%. After all player's have been eliminated, all points are totaled up (kills, bunkers uncovered, MGs destroyed). The highest scorer wins !

Its a fun, fast and furious game and has a small footprint to carry to a convention. Maybe someday I'll get more Germans painted up and be able to use the French or British for the raid....

Tuesday, September 21, 2010

Some rubbled buildings....

I've been re-reading Island of Fire from Leaping Horseman Books about the battle around the Red Barricades factory (they have some of the best books on the subject in the business), so I figured I needed to make some buildings (out of cardstock) so I can do some 15mm Stalingrad battles.

I've got about 1/2 of the number of buildings I need.
Not quite enough buildings yet....
I've got the templates down so that I can easily create inner-outer walls and the process down on how to print them on a single side and fold them over to create inner and outer walls easily. For mere pennies I can create rubbled buildings in any configuration I choose to (they have to fit my 3 inch hex grid).

Now I have to just make about 15-20 more......

Tuesday, August 31, 2010

Creating Hex Grids

I've received a few emails asking how I generate my grids I use for my wargame maps, so I figured I'd show you. I use a small program I wrote in VBA (for Visio).
The parameters
I made a 1" hex shape in Visio and saved it as my base shape. It is this shape, along with the hexdot and label that is the basis for all the grids.

All I have to do is scale the hex based on what size I need (1 = 1 inch, 1.5 = 1.5 inch etc) and the math takes care of itself as it generates the grid.

I can input a page size and it will automatically calculate how many hexes will fit completely on that page at that page size.

The hexes themselves can be with or without label, hex dot, or hex outline as desired.

The grid itself can oriented normally or 90 degrees and I can make the odd (1st row) higher than the 2nd or vice versa. It also centers the whole grid on the page and automatically generates the proper layers for the shapes (layers help when adding things later, like terrain, etc and allows a quick change to all items on that layer).

All in all, it is a simple and decently fast program (although it will take awhile to make a grid of 1/2" hexes on a 40" x 40" sheet though) and allows me to create grids of any size I need, along with their labels.

Thursday, August 26, 2010

New After Action Report is up

I've completed the AAR for scenario 3 at Where the Iron Crosses Grow.

Enjoy !

Thursday, August 19, 2010

Endgame posted in "WtICG"

I've posted the endgame (anti-climatic as it was) in "Where the Iron Crosses Grow" here WtICG

Sunday, August 15, 2010

New post in "Where the Iron Crosses Grow"

I've put the 1st part the next solo scenario up in my AAR page.

Enjoy !

Wednesday, August 11, 2010

Computer Crash !

Sorry for lack of posting (I've got another AAR for "Where the Iron Crosses Grow") but my laptop dumped on me.

I hope to get it back and running soon.....

Friday, August 6, 2010

Some Trenches...

I figured that since I'm on a roll making terrain, I needed some trench parts. Presto ! Its amazing what you can get done when you put your head to it.....

Now I can make that 15mm "Bunker Busting" scenario.....

Wednesday, August 4, 2010

Some new terrain to use

I made some railroad tracks so I can incorporate that kind of terrain into my ww2 game.

Maybe I can create an event where a train actually pulls up (as a reinforcement event :D).

I hope to get to use it soon....

Friday, July 30, 2010

A not so peaceful interlude....

I've completed solo campaign scenario #2, but for a quick interlude I have jumped in the time machine to 1944 to test my rules with some later war armor. These are using my rules described in "Where Iron Cross Grow" narrative section.

I devised a simple scenario to see how some later war German and US armor plays out.

The situation is somewhere in France after the breakout from the beaches. An experienced platoon of 4 Shermans is heading down a road and is ambushed by a Tiger and a Pz IV. The Germans are suffering from scarce ammo, so there is a better than normal chance they may run out of AP rounds ! I won't detail the shot by shot basis but give the action in general.

The situation at the start.
The 1st two Shermans have just forded a shallow stream while the other 2 provide overwatch. The Germans have a hull down Pz IV on the hill and a Tiger in the woods to the top of the map.

German initial shots are good and manage to penetrate both Shermans on their side of the stream, but their penetration rolls are not so good. The Shermans are not destroyed, but immobilized and shocked (I forgot to apply the "brew up" rules to these guys and it might have made a difference- so much for being the rules writer !).

The cards favor the Americans, and they manage to recover enough to throw some Willie Pete (White Phosphorous) on the Tiger, causing him to button up and partially blinding it. They also manage to get their other Shermans across the river and heading south of the hill thanks to a generous Initiative Card pull.

The German reaction is sluggish (they didn't get much reaction time) and the US response has been top notch (The WP vs the Tiger is a great move and something with the American preponderance in that area should use a LOT). The Pz IV vacates the hill and retreats toward the Tiger, while the Tiger fails to do anything meaningful (they failed their MC to rally the shock) as it sorts itself out from the shock of being WPed with the turret open.

The Pz IV retreats while the Tiger tries to get its stuff together.

The Tiger finally gets a shot off and kills one of the immobile Shermans near the stream. The Pz IV and Shermans moving through the village trade a few shots with it as it retreats north through the town. The Pz IV (and German) luck runs out (bad initiative cards again) and its destroyed scuttling away.

Meanwhile the Tiger finally puts paid to the other Sherman immobilized near the stream, but the Shermans approaching from the now-vacated town (oh for some hidden infantry with Panzerfausts !) manage to immobilize it in return. The crew panics and abandons it. The US has won.

All in all, an enjoyable little fracas that played out in about 10 game time minutes.

I figure I'd show an example of AFV cards I use for this game (they are laminated so I can note things on them such as Armor Leader, ammo loss, armor degradation due to extra damage, etc).


As noted I forgot to apply the brew up rules for the Shermans, and it might have made a difference, but the Germans never seemed to get the cards. Unrealistic ? Maybe. Fun ? Definitely......

Wednesday, July 28, 2010

Finished with scenario 1

Scenario 1 of my 15mm ww2 campaign is done and written up in 3 parts over in my narratives over in the "Where the Iron Crosses Grow" blog.

Monday, July 26, 2010

Changes...

Ive resurrected my after action report and added a (temporary) Products and Services page.

Sunday, July 25, 2010

Some changes to my blog...

As you can see, I've made a few changes to my blog. More are coming, so stay tuned !

Thursday, July 8, 2010

Road and Stream templates

I've created some more templates for my base map I posted yesterday.

First, the roads (this is a small portion at about 50% size because the bitmap is so large):


Second, I have the 1st stream templates (they follow the hex spine and spill into the adjacent hexes in my rules) at about 50% size.

Now I have to come up with some fields !

Wednesday, July 7, 2010

A new hex grid base map

I use hexes a lot for my miniature games, as they speed the games up a lot- not having to measure things with a tapemeasure or yardstick is a definite speed increase !


As such, I've been experimenting on creating a new base map for my 3" hex games. This is a small part of the whole piece (I print it on 36" x 50" or so) that I can lay out with any other map of that type so I can get field size I want in any hex-grain direction.


I've also been working on some hills templates for these which I can cut out (I've cut this image down 25% so it wouldn't make as big a file) :


And while I was at it, I figured I'd try to see if I could make some decent tree templates as well:


I'm not sure about the tree template yet, but I will use some of the hills for my WW2 15mm ruleset. I hope to post some pictures soon, so stay tuned.


Wednesday, June 16, 2010

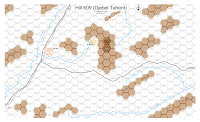
Hill 609 (Djebel Tahent) Tunisia, 1943


I've been reading Rick Atkinson's excellent An Army At Dawn, an excellent book on Operation Torch and the campaign in Tunisia. In that vein, I figured I'd make a map for PB/PL/AIW or PG use.

I chose to use more of an AIW style for this map (as I will for any more Tunisian maps I will make) as it seemed to represent the terrain well.


Djebel Tahent (Hill 609) is bounded on the South and East sides by cliffs (hence the black lines). The streams were apparently dry or very low as I do not hear them mentioned much in the battle. They probably should be a small movement hinderance to non-foot units, but much more of a hinderance to half-tracked and wheeled vehicles.


The Germans (a composite regiment called Barenthin- composed of convalescent veterans and paratroopers- a tough unit) were set up on 609 and the surrounding hills north of the stream and northwest of Sidi Nsir.
The American 34th Division was entrusted with clearing the area. Needless to say, the battle was tough with many attacks and counter-attacks and lasted from may 27th to April 1, 1943.

This map could also be used for some generic WW2/AIW actions as well.

All in all, a fun map to make, allowing me to extend my mapping symbols to cover some new ground other than Russia.

Any suggestions and all comments as always appreciated.
Edit: North should be about 60 degrees to the west, not straight up (I've corrected this on the map but am not going to repost a new PNG).

Thursday, June 3, 2010

Back from Nashcon

And a good time was had by all.

As always, the Nashcon convention, although small, was well done.

Check it out http://hmgs-midsouth.org/

Next year I'll have to put on a game or two....

Thursday, May 27, 2010

Off to Nashcon !

Heading out on the road again to the miniature convention in Nashcon. I'll bring a set of my Stalingrad maps and my overview map along.

I hope to see you there !

Tuesday, May 25, 2010

Back from a break.....

I've returned from a break with my family and am ready to get back to map making.....

On deck I have ability to creat a Brest-Litovsk (1941) map and environs....

Also for a Sicily 1943 (Gela area) map and some Tunisia 1942 maps...

Stay tuned.....

Monday, May 3, 2010

A Stalingrad Scenario- Spartakovka One


Now that I've got a Stalingrad map, I can make Panzerblitz scenarios for it.

Disclaimer: There is no balance built in to the scenario. I feel that if you are fighting a battle and its even, you are one step away from losing that battle. Also, this has not been playtested. Besides, so many folks use different versions of PB/PL/AIW that it would be pointless for me to focus on one. To that end, I will introduce the forces and let the players decide how to compose them from the units that come in PB as I would use them, and allow them to modify these so that it fits their counter set(s). Also, the Fortifications can vary depending on which rule set you use, so they can be adjusted as well.

The length of turns is an arbitrary 20 length. In actuality, the fight lasted over a period of weeks.

The dark area is out of play. Units must set up in the areas as designated in red on the map. The German 194th Artillery Regiment is off-map to the West. The Soviets have no massive off-board artillery, as they are currently being used in the life and death struggle for the factories to the South, but do have some help from the Volga flotilla.

Victory in is total if the Germans control all of town hexes. If they don't control them all, then the degree of victory will vary. Again, I leave this up to the players to decide.

Germans:
267th Infantry Regiment(3 Battalions): 24 Rifle, 75mm IG, 150IG, 37mm AT, 3x81mm Mtr, 3 Trucks
274th Infantry Regiment(2 Battalions): 12 Rifle, 75mm IG, 37mm AT, 2x81 Mtr, 2 Trucks
194th Pak Battalion: 76mm AT (Russian captured), 37mm AT, 2 Trucks
194th Pioneer Battalion: 6 Engineer
194th Artillery Regiment(offboard): 3x105mm Art, 1x150mm Art.
Elements of Kamfgruppe Krumpen(elements of 16th Panzer Division): 1xPzkw IIIJ, StuG IIIF, 2 Eng, 6 Grenediers 2 Halftracks
Elements 16th Panzer Artillery Regiment(offboard): 105mm Artillery.

Soviets:
1st /124th Infantry Brigade: 3 Rifle Co, SMG Co, 45mm AT, 82 Mtr
Elements 282nd NKVD: 3 NKVD Co, 120mm Mtr, Wagon
149th Rifle Brigade: 9 Rifle Co, 4 Smg Co, 45mm AT, 76mm IG, 120 Mtr, 76mm AT
Remnants 21st Tank Training Battalion (anywhere in 149th Brigade area): 2 T-34A (early version T-34 to represent untrained crew in latest T-34). One (players's choice is made at start and he does not have to reveal until he moves the non-immobilized one) is immobilized and dug in (MP value 0, defense +3).
Elements of 2nd /124th and 3rd /124th Rifle Brigade: 3 Rifle Co, SMG Co, 120mm Mtr, Wagon.
Fortifications (anywhere in Russian setup area): 10 Blocks, 6 minefields (randomly pulled), 6 improvied positions.
Offboard support: He has 4 uses of the Volga River Flotilla (he can use at most 1 per turn) at 122mm Artillery equivalence.

Designer's Notes: Designing this scenario was fun. Basically, I took the OBA from the battle from various sources and turned them into PB units. The fortifications choice is a bit arbitrary. There actually is an assault with the rest of KG Krumpen to the North (where the Germans attacked with Stuka support as well), but my map does not extend that far..... Maybe for a future release (Spartakovka Two ?). In addition, the battles for the tractor factory are going on to the South at the same time.

If you have any comments or suggestions, please let me know !

Edit: I mispelled Krumpen on the Map as "Kruppen". I had it right in the text here. Many apologies ! :D

Saturday, May 1, 2010

And now... Ozereyka Bay !

Why Ozereryka Bay ? You may ask "where the hell is THAT anyway ?"


Its just west of Novorossiysk, and the Soviets attempted an amphibious landing there in 1943. Lend lease Stuart Tanks ! Soviet Marines ! Rumanian Defenders (and some Germans for good measure). What's not to like ?


Here's the 1st pass of the map:


I had to guess a bit on the woods (there is mention of clumps of woods where the Germans/Rumanians hid some gun batteries). Otherwise, I think its correct (or as correct as a map like this can be).

I'm still working on a good cliff representation, as well as a better beach style. The full size is about 24" x 30".

Friday, April 30, 2010

And now.... for Prokhorovka !

Here is my Prokhorovka map- its still missing some secondary roads and needs some edge cleanup, but is otherwise close to being done for a 1st pass...