Wednesday, June 16, 2010

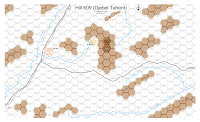
Hill 609 (Djebel Tahent) Tunisia, 1943


I've been reading Rick Atkinson's excellent An Army At Dawn, an excellent book on Operation Torch and the campaign in Tunisia. In that vein, I figured I'd make a map for PB/PL/AIW or PG use.

I chose to use more of an AIW style for this map (as I will for any more Tunisian maps I will make) as it seemed to represent the terrain well.


Djebel Tahent (Hill 609) is bounded on the South and East sides by cliffs (hence the black lines). The streams were apparently dry or very low as I do not hear them mentioned much in the battle. They probably should be a small movement hinderance to non-foot units, but much more of a hinderance to half-tracked and wheeled vehicles.


The Germans (a composite regiment called Barenthin- composed of convalescent veterans and paratroopers- a tough unit) were set up on 609 and the surrounding hills north of the stream and northwest of Sidi Nsir.
The American 34th Division was entrusted with clearing the area. Needless to say, the battle was tough with many attacks and counter-attacks and lasted from may 27th to April 1, 1943.

This map could also be used for some generic WW2/AIW actions as well.

All in all, a fun map to make, allowing me to extend my mapping symbols to cover some new ground other than Russia.

Any suggestions and all comments as always appreciated.
Edit: North should be about 60 degrees to the west, not straight up (I've corrected this on the map but am not going to repost a new PNG).

Thursday, June 3, 2010

Back from Nashcon

And a good time was had by all.

As always, the Nashcon convention, although small, was well done.

Check it out http://hmgs-midsouth.org/

Next year I'll have to put on a game or two....

Thursday, May 27, 2010

Off to Nashcon !

Heading out on the road again to the miniature convention in Nashcon. I'll bring a set of my Stalingrad maps and my overview map along.

I hope to see you there !

Tuesday, May 25, 2010

Back from a break.....

I've returned from a break with my family and am ready to get back to map making.....

On deck I have ability to creat a Brest-Litovsk (1941) map and environs....

Also for a Sicily 1943 (Gela area) map and some Tunisia 1942 maps...

Stay tuned.....

Monday, May 3, 2010

A Stalingrad Scenario- Spartakovka One


Now that I've got a Stalingrad map, I can make Panzerblitz scenarios for it.

Disclaimer: There is no balance built in to the scenario. I feel that if you are fighting a battle and its even, you are one step away from losing that battle. Also, this has not been playtested. Besides, so many folks use different versions of PB/PL/AIW that it would be pointless for me to focus on one. To that end, I will introduce the forces and let the players decide how to compose them from the units that come in PB as I would use them, and allow them to modify these so that it fits their counter set(s). Also, the Fortifications can vary depending on which rule set you use, so they can be adjusted as well.

The length of turns is an arbitrary 20 length. In actuality, the fight lasted over a period of weeks.

The dark area is out of play. Units must set up in the areas as designated in red on the map. The German 194th Artillery Regiment is off-map to the West. The Soviets have no massive off-board artillery, as they are currently being used in the life and death struggle for the factories to the South, but do have some help from the Volga flotilla.

Victory in is total if the Germans control all of town hexes. If they don't control them all, then the degree of victory will vary. Again, I leave this up to the players to decide.

Germans:
267th Infantry Regiment(3 Battalions): 24 Rifle, 75mm IG, 150IG, 37mm AT, 3x81mm Mtr, 3 Trucks
274th Infantry Regiment(2 Battalions): 12 Rifle, 75mm IG, 37mm AT, 2x81 Mtr, 2 Trucks
194th Pak Battalion: 76mm AT (Russian captured), 37mm AT, 2 Trucks
194th Pioneer Battalion: 6 Engineer
194th Artillery Regiment(offboard): 3x105mm Art, 1x150mm Art.
Elements of Kamfgruppe Krumpen(elements of 16th Panzer Division): 1xPzkw IIIJ, StuG IIIF, 2 Eng, 6 Grenediers 2 Halftracks
Elements 16th Panzer Artillery Regiment(offboard): 105mm Artillery.

Soviets:
1st /124th Infantry Brigade: 3 Rifle Co, SMG Co, 45mm AT, 82 Mtr
Elements 282nd NKVD: 3 NKVD Co, 120mm Mtr, Wagon
149th Rifle Brigade: 9 Rifle Co, 4 Smg Co, 45mm AT, 76mm IG, 120 Mtr, 76mm AT
Remnants 21st Tank Training Battalion (anywhere in 149th Brigade area): 2 T-34A (early version T-34 to represent untrained crew in latest T-34). One (players's choice is made at start and he does not have to reveal until he moves the non-immobilized one) is immobilized and dug in (MP value 0, defense +3).
Elements of 2nd /124th and 3rd /124th Rifle Brigade: 3 Rifle Co, SMG Co, 120mm Mtr, Wagon.
Fortifications (anywhere in Russian setup area): 10 Blocks, 6 minefields (randomly pulled), 6 improvied positions.
Offboard support: He has 4 uses of the Volga River Flotilla (he can use at most 1 per turn) at 122mm Artillery equivalence.

Designer's Notes: Designing this scenario was fun. Basically, I took the OBA from the battle from various sources and turned them into PB units. The fortifications choice is a bit arbitrary. There actually is an assault with the rest of KG Krumpen to the North (where the Germans attacked with Stuka support as well), but my map does not extend that far..... Maybe for a future release (Spartakovka Two ?). In addition, the battles for the tractor factory are going on to the South at the same time.

If you have any comments or suggestions, please let me know !

Edit: I mispelled Krumpen on the Map as "Kruppen". I had it right in the text here. Many apologies ! :D
Saturday, May 1, 2010

And now... Ozereyka Bay !

Why Ozereryka Bay ? You may ask "where the hell is THAT anyway ?"


Its just west of Novorossiysk, and the Soviets attempted an amphibious landing there in 1943. Lend lease Stuart Tanks ! Soviet Marines ! Rumanian Defenders (and some Germans for good measure). What's not to like ?


Here's the 1st pass of the map:


I had to guess a bit on the woods (there is mention of clumps of woods where the Germans/Rumanians hid some gun batteries). Otherwise, I think its correct (or as correct as a map like this can be).

I'm still working on a good cliff representation, as well as a better beach style. The full size is about 24" x 30".

Friday, April 30, 2010

And now.... for Prokhorovka !

Here is my Prokhorovka map- its still missing some secondary roads and needs some edge cleanup, but is otherwise close to being done for a 1st pass...

Tuesday, April 27, 2010

My base Stalingrad map

I figured I'd also post my base map (without hexes and no corrections for a hex grid or woods or roads) This is what I will print and hang on my wall and can refer to when reading stuff on Stalingrad as my handy reference.


Also from this I can make a scaled down map to any part of Stalingrad (say 1:100 yards or even lower if desired).

Stalingrad at last !


I've finally finished my Stalingrad map at Panzerblitz scale (1 hex = 250 yards/meters). I can make it as one large map or 3 smaller maps (South, Center, and North).

All in all, it is over 120" long when put together. It does put the fighting for the city in perspective :D

Now all I have to do is find some good scale maps with decent detail of Prokhorovka.....

Thursday, April 22, 2010

Some of my Microarmor counters...

Here are some of my (double sided) counters I use for my platoon-sized Microarmor rules (scale is 100 yards a hex).

This is a 3 Battalion German Regiment, with mortars but minus the Regimental Guns (infantry and AT). Of course the left half is the front, the right half the back.


Double sided counters are really easy to make, just cutting them out can be a bit of a chore, as you have to be careful. If you have access to one of a good bread-board cutter, it helps a lot. Just make sure you mirror the backside when creating the sheet (pretend you are just folding it over and see if it matches up).

I've got the system for double-sided counters down pat. Maybe I should publish a HOWTO artcle with pictures if anyone is interested.....

Tuesday, April 13, 2010

Some Panzer Leader Type counters...

In addition to working on my Stalingrad Map, I've also worked on some historical Panzer-Leader scenarios and counters using the maps. The counters here are all double sided (the lighter side is a step loss), and have a lot of extra info that my own "house" rules use, but work just as well with the original rules if you ignore all the extra stuff.


First up is a generic 3 Battalion Regiment, along with some 279th Division troops. Included on this sheet is one (of three) light artillery Battalion and the Division's medium artillery Battalion and some sundry divisional transport (mostly wagons, but a few trucks as well).


Stalingrad Center (250) map

Here it is, barring any last minute changes:


There's still about 1/2 more of a map size to go for South Stalingrad (including the Grain Elevator).


When you look at as one combined map, you get a very good impression of just how large a battle went on there back in Late 1942 - Early 1943.

Thursday, April 8, 2010

Stalingrad at 1 hex = 250 meters

Here is the almost finished central section of my Stalingrad (Panzerblitz) map.


The (non-grid, non-yellow) portion is my previous Stalingrad North map, which this one mates with. I have the flexibility of printing it as 2 maps or one long one as I feel needed.

It still needs a bit of work, such as labeling and such as well as some cleanup to determine where city/town hexes exactly are etc, but the bulk of the work is done.
I'll post a final version (labels, etc) when I final proof the map (there are some corrections that will need to be made).
Stay Tuned....

Thursday, March 18, 2010

From the fields of France to the Steppes of Mother Russia....

Hundreds of miles and over 1000 years in time is an abrupt change of pace from my last post, but my mind tends to work in strange and mysterious ways......


This is a WW2 scenario I concocted to test some rules I came up with for small-scale AFV/Infantry actions. Strangely enough, the inspiration for the AFV rules came to me in a dream, which I shall not bore you with here and instead bore you with this after action report !


The scenario is Summer of 1941, Southern Ukraine. The German juggernaut in the South had a much harder time than the Northern and Central Armies because of the sheer number of Soviets they faced and the fact that they had a reduced number of Panzer Divisions to deal with this threat.


A Soviet small local counterattack has broken through the lines with 2 T-34s heading toward the rear to mess with the supply troops. A lone German early MK III which had been in the vehicle park under repair is the only thing stopping these rampaging Russians.


The Pz III manages to ambush then two tanks by hiding in a small wooded ravine (the wood template I have serves as a stand-in for wooded ravine) as they made their way toward the German rear. At Start:


The German successfully hits the lead T-34, with its 2nd shot, immobilizing it with track damage. A third (and final allowed shot this turn) manages to even penetrate the turret armor (barely) but is a dud. The Soviet crew bails out in a panic. Now the odds are 1:1 !


The German kicks his tank into gear, figuring that a moving target has a better chance to avoid the remaining T-34s gun. This is good choice- the Soviets don't hit as well as the Germans, and with the German commander exposed (CE) the German has a better shot back on the move than the Soviets, something these early model T-34s with their 2-man cannot do (the commander was also the gunner).


The Soviet wins the initiative roll, pivoting and coming to a stop in order to get a better shot (firing while moving is not very effecient.) He manages to pop a shot that misses by a mile. His MGs however (as he is close enough to the German tank) spray the German tank good, causing his commander to check whether he has to button up or not. He passes, but barely.


Pre-German Turn 2 (T-34 has moved and fired).


The German has almost no chance of penetrating the front armor (either turret or hull) of the T-34, but decides to fire anyway and hope for luck (it is usually better to fire early in a turn instead of later, as the further you move and use MPs, the harder it gets). Of the 3 shots, 1 hits the front glacis and bounces, a 2nd manages to hit a hatch on the front glacis (Non-penetrating, causes a shock check for the Soviet which is a good thing for the German).


As his tank is in motion, the German continues moving forward and around the flank in the hopes of getting a better shot. The Soviet, being close enough, gets a chance to snap shot at the German as he runs across his front. He fails, probably from not hearing the commander over the ringing in their ears from all the hitting-non-penetrating shot bouncing off the hull !


At the start of turn 3:


The German wins the iniative and manages to score 3 hits on the T-34. All non-penetrating but causing further shock checks. He continues to wheel around the flank and towards the T-34 rear.


The Soviet passes the shock check, and manages to re-start and spin in place and stop again(vehicles that are stopped must attempt to start and may fail based on reliability and training), taking a shot at the mobile Panzer. A clear miss. His next shot should be better as he will not be in motion and he will only suffer turret movement penalties if the Panzer moves out of its line of fire. The Dance of Death continues....


Turn 4


The Soviet gets the iniative and promptly misses its shot (its Rate of Fire is very low). It sprays turret MG fire in frustrated rage, but the German commander in the command cupola does not budge. To top it off, the T-34 fails to re-start, so it cannot pivot its front facing toward the German.


This is the chance the German was waiting for and he got it. He hit the side of the tank and the AP round (before firing you declare what type of round you are firing, usually AP, but HE vs soft targets and some have smoke as well). burrows into the innards of the tank, destroying it decisively. The Soviet penetration is halted !


The home-brew rules are pretty simple and I use AFV cards to hold a lot of the info for the game (They are also able to be written on in eraseable marker to note things that can change from game to game or to denote extra damage).

This is an example of an early T-34:


Where do I go next ? I am not sure. I guess it depends on who shows up to play in our next session and what they feel like playing (The Vikings and Carolingians are still out :D)

Tuesday, March 16, 2010

I had to turn on Comment Moderation..

Due to some nefarious individuals attempting to hawk their wares on this site. I'm sorry to have to do this, but I don't have any choice.

Stay tuned. More Wargaming to follow.....

Tuesday, March 9, 2010

Finally got some players together and had a scenario played. The results where very good (well, for the winner they were good, the loser, not so much :D).

A large Viking raider force had the bad luck of raiding near where a local Duke had been campaigning against a rival. The two rivals put aside their differences and combined to attack the raiders.

In addition, the raiders had not had time enough to gather enough horses to mount their force (something they were known to do before trouncing through a region) and so were not as mobile as they were wont to be. They also were a bit scattered as they were in the process of acquiring the mounts when the Ducal army came upon them.

The end result: they were run down by a slightly larger army and forced into battle.

Olaf Six-Tooth and his brother Sven the Cross-eyed gathered their troops as best they could, each taking a unit of their best troops to lead.

The Dukes of Framage and Merde disposed of a slightly larger force, superior in cavalry and archers, along with enough infantry to match up with the Viking foot.

The Vikings knew they had to attack and break the force in front of them to get away, as they had few other options, seeing as their enemy had archers and they did not, so they advanced to the attack (besides, what good Viking wouldn't want to attack ?).

Olaf (the elder) took the lead and led the main attack on the Ducal line. At the first sign of the Ducal archers letting fly their feathery shafts, he proudly stood up in the stirrups of his horse (he and his brother had some of the few they had acquired) and yelled encouragement to his men "Boys ! They canna shewt fer Sh.." His last words never heard as a feathery shaft found his eye-hole and buried itself into his brain.

It was all downhill for the raiders after that. The Vikings put up a valiant struggle, but Olaf's death seemed to take a lot of the fight out of them. Their attack petered out and the Ducal army pushed them back. Sven, upon seeing his brother go down, seemed to lose heart himself. Or maybe it was because the Ducal Cavalry came down upon him light thunder and wiped his unit out.

Valhalla was suitably filled after the battle, the Ducal army thoroughly trouncing the Vikings and suffering some casualties, but nowhere near as many. The Dukes praised God and each other for their great victory over the hated Northmen.

Of course, within hours came to blows again over who would take most of the credit for this victory over the heathens from the North. And so the continued tragedy of the Dark Ages.....

Tuesday, February 16, 2010

Now that I am getting back into some miniature wargaming, I think I'll discuss a few things I typically use.

My figures are mounted on single metal bases I cut from scrap from a local metal shop. For aesthetic purposes, I flock these (usually green grass, but sometimes a sandy tan).

My movement trays are actually good strength strip magnets, stuck down to heavy cardboard stock and flocked a color depending on which side they are (black and tan). There are 3 sizes. I can then put as many figures as needed to create a unit on a base, and allow removal of figures when they are casualties. The good magnets allow the trays to be moved without knocking over individual figures.

Another good feature is that it allows me to mix and match forces as needed (e.g. allies) from the different nationalities I have, with minimal confusion as to which side those forces are on. I can even have deserters from one side set up on opposite sides. For an some pictures of the bases in action, look at the archive from back in January last year.

This flexibility allows me to mix and match bases as needed. For example my DSR Mass Battle ruleset (DSRMB), each unit actually takes up 2 hexes, so there are 2 bases placed side-by side per unit (although skirmishers can move seperately). I get the bases out, set the figures on the bases, and off the battle goes.

Most of my rules use hexes of various sizes, although the most common is a 3" grid. The grid makes the game go by fast (something I strive for in my rules), with no measuring needed.

I handle terrain in 2 levels- I have color acetate sheets with various hills, woods, and streams that I lay down. I can play the game that way or if I want a more 3D effect, take the time and lay out various tree clumps which are removeable if a unit wishes to move into that hex. For a good example, look back in the archive to June of last year for my terrain templates and my tree clusters.

Its a simple system that is very flexible. If you have any comments or suggestions, please let me know- I'm always open to new ideas.

Thursday, December 31, 2009

Have a happy and safe New Year !

Sorry for the enforced hiatus, but since a basement flood, I've not been doing much wargaming lately. That is something I want to get back into in the new year when I hope to get back to regular posting again.

Take care, and see you in the New Year !

Friday, October 2, 2009

A discussion about random terrain generation

I've recieved a request to discuss some ideas about random terrain generation.

I'm in the process of collating the ideas etc for some posts on the subject (along with some pics for descriptive purposes).

Stay tuned....

Tuesday, September 22, 2009

A word about unit counters..

I've had a few requests about the unit counters I am using, so here's a sample of them.


These are all double-sided counters.

The front is the full strength side, while the back is a partial strength. It has all the numbers needed to play the miniatures game on the counters.

To create a unit counter, I take a picture of the figure type, modify the picture to make it easier to print out (take out background, etc) and use that for the main picture of the counter.

I print them out on full sheet labels, then cut and put that on cardboard.

It is easy to make double-sided counters, you just have to be sure that the back-side is a mirror image of the front (so when you past the back sheet on, it matches the units on the front).

Here is an example of a 1/2" sheet, both front and back. I cut the two halves out and mount on appropriately thick cardboard and Voila ! Double sided counters.

Tuesday, September 8, 2009

Campaign Moves... an example

So. I've got the army lists, the strategic tiles, the miniatures and the tactical rules all set. Here's an example of a "Roma Victo" campaign of Romans vs Gauls in a non-historical environment.

The Strategic tile is used to help add some flavor and maneuvering before getting to a miniature battle. I randomly determine a start point where the Romans are (denoted by the Red counter) and then determine where the Gauls are (denoted by the Green counter).

A key to the strategic moves is that the Romans (the attackers) must always move adjacent to the Gauls (the defenders). After each Roman move, the Gauls can attempt to react- that is move away and delay the inevitable battle or into better (e.g. non-clear or river) terrain.

The Romans have 6 Movement Points (MPs) to use per strategic turn. Turns here are bi-monthly, with weather effected by Month of the year (see weather system described before).

When 6 MPs are used up, the Gauls have successfully avoided combat for a complete turn (something that delays their conquest, which is a good thing). When a battle occurs, this also ends the turn after the battle if fought.

All weather was clear for this turn.
Move 1: The Romans move from A0506 to A0406 as indicated by the red arrow (1 MP). The Gauls make their reaction roll, and move to A0305, skulking behind a river.
Move 2: The Romans, not wishing to attack across a River, will attempt to outflank it to the North by moving to A0306 (1 MP). The Gauls fail to react. if they had succeded,they could have reacted to A0206 or even into the Roman hex, initiating combat, albeit without a River bonus.
Move 3: The Romans attempt to outflank the River position held by the Gauls by moving to A0206 (2 MP). Note that it cost 2 MP to move across the River , and weather can increase this cost of 1 for clear terrain, 1 for crossing the River.

Roman luck appears to be holding (weather wound up being clear for this Strategic Turn). The Gauls are caught still in camp, and fail to react again, allowing the Romans to steal a march and outflanking what would have been a good defensive River position.
Move 4: The Romans, with 2 MP left, move into the Gauls in A0305 (1 MP), and Roman luck finally runs out, as the Gauls finally pass a reaction roll and duck into the woods at A0304. Wascally Wabbit !
Move 5: The Romans do not have the MP to enter the woods (2mp) , but don't want to end the turn. So they have the ability to force march (which can hurt them in the tactical battle). They succeed with their roll, albeit a few of their cohorts are exhausted in doing so.

The Romans move into the woods, and the Gauls decide this is as good a place as any to offer battle to a tired foe. The terrain is wooded with a level 2 hill concentration (2 hexesides in A0304 have hills on them).

The battle is fought, and the Romans win a hard-won victory in a wooded, hilly environment with their exhausted cohorts (they lost 3 cohorts and an auxillary Light unit, while the Gauls lost several Warbands.) However, enough Gauls survived the battle to withdraw, which the Gauls do to A0404.

More importantly, the conquest track is advanced 1 box (this mythical "country" has 3 conquest boxes- so three successful battles need to be fought to conquer it).
This is the start of another strategic turn. Reinforcements/events occur now, and weather is determined again. A much diminished Gaulish force will be running for its life this turn, delaying and hoping to gain more reinforcements for the next turn.

All in all, its an easy system to generate tactical battles and give some "flavor" to a generic campaign game.


Monday, August 17, 2009

First Step- The Army lists

Some more ideas on DSR RV ("Roma Victo") campaign ruleset for my Ancients/Medieval rules.

I composed Army lists for all the figures types I had, varying their army stats as I felt appropriate.

For example, this is the Imperial Roman army stats:

OR: 5
This is the operational rating (usually 1-6). It is used to determine how far you move on the conquest track. You compare opposing army's ORs, roll dice and the difference is moved on the track, upward if you won, downward if you lost. The higher OR, the better strategic or long term planning for a campaign that army has. Horse Barbarians would have a very low OR, as they usually were not out for conquest but mostly plunder.

LR: B
This is the Logistical rating (A-F). A is best, F is worst. An army that had a logistical setup, as opposed to "living off the land" has some advantages for a long conquest campaign. This influences attrition and reinforcement rolls.

Init: 6
This is the Army's initiative. This influences movement on the Maneuver Board (more of that in a later post). It also influences tactical battle setup. (Yeah, I said mapless campaign but I should've said NEARLY mapless campaign ! :D)

BP:D Mor 7 H6 L3
These stats are used for the tactical battle, These are Army Breakpoint, Morale, Heavy Divisions and Light Divisions. These can be effected by conditions that occur on the campaign board.

And of course I have the stats for individual units that compose the army (Cohorts, Auxilia etc.) I use with my Ancients rules.

Saturday, August 15, 2009

A few ideas.....

I just had a few good ideas for a solo/semi-solo map-less campaign system for my ancients rules. As I firm these up I'll post them in more detail.

I'm also mulling over a few requests by some folks to post a detailed battle using my ancients rules, and as it would be easier to understand some of the things I'm doing with my campaign systems, I might just oblige.

Stay tuned !

Wednesday, July 29, 2009

Back From Historicon and parts unknown....

I'm back from Historicon and hope to have a post or two up soon. Stay tuned....

Monday, July 13, 2009

Off to Historicon !

I'm heading off to Historicon ! I hope to see you there !