Thursday, June 26, 2008

Taking a tangent (sort of).....

I worked out the basic set of skirmish rules over the weekend, and they seem pretty decent (trials with friends went well). However, I still had to resolve how to be able to play my skirmish game and my Vini Vidi Vici miniatures game with the same figures. The skirmish game requires individual figures, the Vini Vidi Vici units of figures grouped together.

Foresight (e.g. plain dumb luck) led me to mount all my figures on individual metal bases, colored to that side (Romans = red, Carthaginians tan, etc).

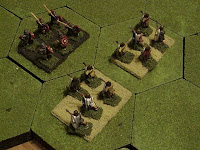
By happenstance (e.g. plain dumb luck) nature provided an answer to my problem: Strong Magnets. I found some strong magnetic rolls (not the simple ones you find in the craft store- these are .06 inches thick and are very strong). The idea is to group the figures on the magnetic stands when I play Vini Vidi Vici and use them individually for the skirmish game (as a bonus instead of using casualty rings in the Vini Vidi Vici game, I could actually remove the figures).

As you can see, I decided to flock the magnets with the finest grain turf I could find (Woodland Scenics). One side is a yellow grass color, the other a soil color. This also allowed me to flock the individual figures with a blended grass color- which I think looks better than the colored bases I was using before. That is also the reason you have to get the strongest magnets you can find ! That extra layer between the metal and the magnet reduces the binding by a lot.

The bases are used for movement in the Vini Vidi Vici game. The magnets are strong enough to keep the figures from falling off and the color makes it easy to differentiate which side a unit is (especially when both sides close into a general melee). I also mounted the magnets on some thick-ish cardboard (the rolls I bought where sticky on one side) so that they could be picked up by the bases.

Another bonus to doing this is that I can use my markers (I used small washers to indicate hits, morale status, etc that I would lay on the figures). Now the washer can lay on the base without having to place it on the figure. I can also make small markers (cheap craft magnet counters) to indicate what a unit is for novices who may not have a handle on all the troop types etc.


All in all, I'm pleased with the results. It provides a terrific flexability in use of figures and rule sets. I've created different size bases depending on the unit and its current size. It also allows me to use troops that would normally be on one side only (e.g. Roman) and use the same troops on the other side (perfect for that Roman Civil War stuff).

Wednesday, June 18, 2008

Velitatio Proelium

My latest idea my fevered mind has come up with is to be able to do skirmish wargaming using the same figures as I use for my tactical game. I've decided to call the rule set DSR Velitatio Proelium (roughly "Skirmish Battle" in Latin) or DSRVP for short.

I need to rebase my figures on smaller, one on one metal bases (5/8 inch long and 3/8). Using the magnetic movement bases, I can still compose the larger tactical units or debase them for my skirmish ruleset.

I'll still use the 3" hexes for the skirmish game, with combat occurring in the hex itself instead of with adjacent hexes. I can even make smaller "unit" bases for the Romans and other trained troops so that they can fight with an advantage, until that formation is broken.

Cavalry will be individually mounted as well, as will leaders/banners/musicians. I'll try to give it a try this weekend with a few of the rebased troops and possibly post any pictures sometime thereafter if the idea seems to work.

Tuesday, June 17, 2008

Why can't a Roman Civil War be civil ?


So I've now got the rules for tactical battles written up as well as a system for campaigns (Vini Vidi Vici). I need a way to integrate the boardgame with the miniatures game.

As the picture of the 9 width hex at the left shows, the terrain on the Vini Vidi Vici map is pretty simple- Clear and woods. Rivers and rough terrain are handled on the hex edges instead of the hex itself. How hilly a piece of terrain is determined by how many hexsides have a ridgeline or mountain next to it.

For example, if you look at hex E0608 (the hex with the "Thes" in Thessaly), you will see that the hex is clear terrain with 2 ridgelines. This would equate level 2 rough hex, which effects the density of the hills that can be generated on the tactical map, just as woods terrain would effect the density of woods on the tactical map.

The next step is to figure out how this all equates with the tactical board. I settled on a board that was 17 hexes wide (which gives 9 hexes at each of the 6 edges). This fits almost totally on my 4x4 board space I currently have (there is a little overhang on 1.5 hexes, but that is not too much of a problem).

The hex configuration allows me to randomly determine the set up halves of the board once all the terrain is generated. There are 3 possible axes that result, allowing me to actually use that terrain more than once if desired without having to take the time to regenerate it.

To test the whole tactical battle board out, I created some random charts to create forces of somewhat similiar size and composition, with a little randomness thrown in. The forces that fight will be about the average to small size that would fight in the real game.

Force A (the defender which we'll call the rebels) is composed of 3 regular cohorts, 2 archer auxilia, 3 javelin Auxilia, 1 trained auxilia, 2 levy auxilia, 1 heavy cavalry unit and of course the grizzled army general. The cohorts and the heavy cavalry are the best heavy units, of course, followed by the trained auxilia and the unenthusiastic levy auxilia. All the Roman regulars and the cavalry are treated as drilled (this allows them a little more maneuverability on the battlefield). The trained auxilia is decent, but the levy auxilia will be prone to run away if things get tough.


Force B (we'll call them the "loyalists") is the attacker. It is composed of 2 Veteran cohorts, 2 Levy cohorts, 2 Levy auxilia, 4 Light auxilia, 2 archer auxilia and the loyalist general.


Here is the terrain I generated on the tactical board (I assumed open terrain with no modifiers for hills). The Rebels set up on the left, Loyalists on the right. This is the picture after the 1st move for both sides.

The loyalists had to break the rebel army in about 12 turns (the end is randomized, it could be 12 turns, it could be up to 20 to keep both sides guessing) or they would be the loser and have to retreat from the strategic mapboard.

The Rebels had the advantage of a heavy cavalry unit, while the Loyalists had nothing to counter it with than their more veteran legionaries. The best bet for the Loyalists was to pepper the Rebels with missile fire, waiting for some part of the line to waiver before sending in the heavier troops. The Rebels, however were not going to play that game, being inferior in missile troops and in general quality level. They were going to take the offensive.

The Rebel heavy cavalry (in the lower left corner) charged out and attacked the Loyalist Veteran cohort nearest it, Taking casualities from missile fire but keeping on coming. The veterans broke, and the heavy cavalry looked poised to run over some lighter troops and take the rest of the Roman line in the flank while it was engaging the main Rebel force.


But the stalwart archers kept inflicting losses upon the cavalry, halting their charge and driving them back. In the process they became heroized (a fate condition that allowed them to re-roll 1 failed morale check). The threat was averted !


This is the poor cavalry unit that almost caused so much havoc. I use magnetic movement bases (I base my figures on metal) so that I can lay the my marker washers on the base, instead of on the figure (it helps prevent some wear and tear). It also serves as an easy way to organize and move the figures around the board. As a side bonus, the magnetic bases are color coded (hard to see from this angle, but readily apparent to the players) red and green, so that it is easy to tell which side is which when things get jammed up in melee.


But back to the battle ! At the time of the cavalry charge, the Rebel's main line contacted the Loyalist's main line and a fierce melee ensued. On the Loyalist's right flank (upper left of the picture) the levy infantry chased the Rebel light infantry into the woods and became entangled in a deadly game of cat and mouse.


Against all odds, the Royalist center broke and, despite the setback on the flank (a victory there would've probably won the day for the Rebels), they still seemed poised to win the day.

But again, luck was not with them. The under-appreciated light and archer auxilia held the main thrust up at the cost of blood until the Royalist center could recover. The battle started to turn against them...


The beginning of the end came when 2 Rebel cohorts rolled morale checks of "12" (fate in a bad way in my rules), which meant that they had enough and fled the field. This left 1 cohort with the army general surrounded in the middle of the field. The rebel army was broken- Long live the Royalists !


The game took about 1.5 hours to play and 10 min to set up. It lasted exactly 12 turns before the surrender.

Now to take the result and apply it to the campaign game.

The Loyalists lost about half of a veteran cohort and a levy cohort, as well as 2 light infantry. The archers were beaten up, but survived in a reduced state. Since they won the battle, they could recover some of those losses. I'd flip and remove the appropriate counters from the strategic board and place this army in the hex it has won.

The Rebels lost 2 cohorts, all their levy and most of their light infantry. The cavalry unit survived in reduced form. I'd flip and remove the appropriate counters on the strategic board. Since they lost the battle, they could not recover any of their losses and would have to retreat to an adjacent hex. This will be a much reduced army that would need reinforcements during the next campaign turn.

The side with more cavalry would be able to gain some pursuit bonus (if it won) or possibly recover some of its losses (if it lost). If supply status of the army had to be taken into account, that would affect the general morale levels of the army. A campaign has so many things to take into account, but the meaning of each battle is much richer taken in the context of a well-laid out campaign game.

Here is the one page of charts for my rules, written up as I spoke of in the previous post. The rules are 8 pages long. The Vini Vidi Vici rules are about as long and have a few tables as well.

In conclusion, I think I have the basis for a very easy to control, dynamic campaign game. Now I have to find the players with the time and the desire to give it a try....
Sunday, June 15, 2008

A quick word about rule writing

I thought I'd like to write a few things about rule writing that I've learned over the years through painful experience. I've never found a set of rules for any period that I liked all the way through. So, like a mad Dr Frankenstein, I'd take the parts I liked and made up the rest myself (sometimes also taken from other rule sets).

Although it is nice to bring to life a period you have an interest in, sometimes the creation can be a bit of a monster- especially when you have to get back to a set of home-brew rules after a period of time away from them. So I've developed a system (of sorts) to aid me. The key is to be organized.

First, you need to be able to type the rules up so you can print them out. I use Microsoft Word. I have a directory off my documents directory that is called "rulesets" which I also subdivide into eras (e.g. Ancients, Napoleonic, WW 2) then the directory that is the name of the ruleset. In each directory for that ruleset, there will be a Word Document (the rules), a PowerPoint Document (the charts), and an Excel Document (where I create the charts) as well as any other sundry things (pictures, etc).

I do my rules using the bullets and numbering set to outline mode. This way each section has a number and any rules under that the corresponding numbers.

My intro is usually an overview of what the ruleset is, as well as its scale.

My 1st section is always the turn sequence, in as much detail as is necessary for me to follow down it during a game (usually it becomes second nature again after a turn or two, depending on how long I've been away from that particular game).

The 2nd section contains a section that contains definitions. This is an important part of the document, that you will be adding/subtracting from as you refine your ruleset. Standard terminology is a great boon to good rule writing. For example, if I use the term "Good Order Unit" in my rules, I know that it means "A unit that is not marked as fatigued, disordered, or routed". In the long run it tends to create more concise rules that are more consistent.

The 3rd section is used to point out any special procedures needed to play the game (e.g. For a particular ruleset I use wooden blocks set next to units in order to keep track of actions that a unit has done for that turn. If the unit has attacked, the block is placed standing up. If the unit is finished, the block is placed lying down.)

From the 4th section on, tend to follow the turn sequence, each new numbered section detailing a new part of the turn sequence.

The last section(s) are special rules, "chrome" and anything not already covered above.

Do not forget to create the header/footer for the document. I use the name of the ruleset as the header, and for the footer I use "Page # of #" along with a date. This is very important when you wind up with several versions of rules and the pages get all mixed up.

For charts, I use Excel to create the tables I need, then cut and paste them to PowerPoint (giving them a nifty shadow under them) for printing. I try to keep the tables to one sheet of paper, although sometimes its not possible. Clarity is the key !

After you print the rules and tables out, playtest, playtest, playtest. Keep notes of what works and any inconsistencies that crop up. Note potential solutions. The key is to follow the text you've written- if it doesn't work- rewrite it so that it does.

Eventually you will tire of that period and ruleset and move on to another- don't worry ! When you decide to come back to that set again, you will have all the material needed to get it up and running again with a minimal of head-scratching. Enjoy !

Tuesday, June 10, 2008

Parlay ?

The Romans decided to confront the barbarians at the stream side in order to bloody them as much as possible before falling back to the hill to hopefully finish the job. The Barbarians were going to just try to get across the stream as fast as possible with as much as possible in order to hopefully not get entangled in the stream.


The Romans were a bit slow getting to the stream, and could not keep all the barbarian troops from crossing. A wild melee at the stream occurred, which the Romans got the worst of thanks to good Barbarian rolls and atrocious Roman morale rolls. The Barbarians flooded across. On the verge of being overwhelmed, Claudius yells "ALAMO ! ALAMO ! ALAMO !" (yeah, I know its from the wrong age, but what the hell) and started the fighting withdrawal to the hill. One Roman cohort was almost surrounded and cut off, and things looked bleak for the guys speaking the dead language.

The Barbarians were pressing hard on the struggling Romans, when one of the leaders leading the main thrust took an arrow in the eye. The units around him fell back in shock, allowing the Romans to extricate themselves as the pressure lessened as the Barbarians regrouped.


The fighting withdrawal to the hill took longer than expected, as some units kept failing to disengage. However, the constant drain of losses inflicted on the Barbarians was thinning them out for the final engagement on the hill. There were constant pin-pricks from the Barbarian slingers and archers weakening the cohorts, but not enough to create gaps that were exploitable. On the other hand, Barbarian units started rolling bad MCs, weakening their attacks.


When the Romans got to the hill, the Barbarians had enough troops left for one concerted push. The last Babarian leader (they started with 2) lead an assault that cost him his life when he was struck down. The Barbarian hordes broke and ran, leaving the Romans with the field !


Below are the pictures of the battle at certain points:

Shall we gather at the River.. er I mean stream....


The Romans give way, allowing the Barbarian hordes to get across , fortunately for the Barbarians the stream wasn't choked with their dead. Cladius starts thinking maybe he should've called for "Parlay".


The fighting withdrawal to the hill.


The Romans finally get to the hill, after bloodying the Barbarians.


The final stand. The Barbarian attack runs out of steam (and manpower) against the thinned Roman line.

Famous last words of a Roman Centurian.....

"Look Claudius ! They've come to wish us well."

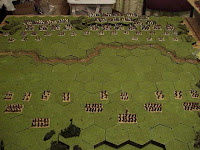
I've taken my ancients miniature rules (written for 6mm and 1.5" hexes) and re-written them for 15mm and 3" hexes. This scale of figure allows me some interesting tactical options I could not do with the smaller 6mm figures and I can actually see the figures for what they are (not a minor consideration for those of us aging wargamers these days !).


In general, Units are composed of from 4-12 figures and can be in one of 4 training states (Irregular, Horde, Formed and Drilled). The better training, the more options that unit has such as disengaging from combat, more movement options etc). Unit face the vertex of the hex, giving a pleasing front/flank/rear (when using the flat of the hex it looks wrong).

Combat is simple- roll dice for the attacker, add mods (like defending uphill) and for each roll greater than or equal >= the target's defensive value, a hit is scored. Depending on a unit's training and other sundry events, the hit unit may have to take a Morale Check, which can result in it running away or standing. Occasionally, a special event will occur, and that unit will become heroic or possibly completely disintigrate entirely.

The turn is a standard IgoUgo, with some reactions allowed by the non-moving side. If a unit is unengaged (not in a unit's Zone of Control) it can also move after it attacks (if engaged it will have to attempt to disengage in order to move, something the better trained troops can pull off). Cavalry that is not engaged and not fatigued can attempt a charge move (which allows it to move and attack until it fails to rout an opponent or runs out of movement).

The winner is of course the one who holds the field at the end, with an army breaking and running when it reaches a certain point.

There are a number of extra chrome rules I've added (like Frenzy- which allows certain infantry units to have a charge move like cavalry) which I can use to spice up the forces in a particular game.

The real reason to re-do these rules was to be able to use them to fight battles generated in my Vini Vidi Vici campaign game (see below). It should be a blast !


The field is set, Romans of course at the bottom and the unfriendlies at the top, getting ready to cross the stream.


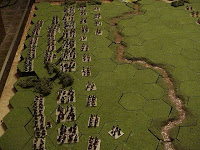
Side view of the weak Roman Legion ("We shouldn't have left the cavalry back in the barracks....")


The Roman's neighborhood association coming to greet them.